Monday, August 22, 2011
Think and Draw Creative Sheet #5: Space Kitty
This is another free printable page for creative drawing and colouring. Feel free to print and use as many as you like! Click on the image to print. You can find the whole collection of Think and Draw Creative Pages here.
Hope your kiddies have fun with it :)
Copyright Verity Heysen Kizek 2011. Must not be altered, resold or used for another purpose.
Monday, July 18, 2011
Making Mondays: Think and Draw Sheet #3 Framed
I hope you all had a great weekend!
This is another free printable page for creative drawing and colouring. Feel free to print and use as many as you like! Click on the image to print. You can find the whole collection (of 3!) Think and Draw Creative Pages here.
This is actually one I created for Yashar in July 2009! I had posted about the idea here but never made the sheet available for download/printing. At the time I had made it for a car trip we were about to go on...so it's perfect timing as we head off on a long car trip tomorrow morning.
Copyright Verity Heysen Kizek 2011. Must not be altered, resold or used for another purpose..
Tuesday, July 5, 2011
Making Mondays: Think and Draw Creative Page #2
I hope you all had a great weekend!
This is a free printable page for creative drawing and colouring. Feel free to print and use as many as you like! Click on the image to print. You can find the whole collection (of 2!) Think and Draw Creative Pages here.
Copyright Verity Heysen Kizek 2011. Must not be altered, resold or used for another purpose..
Monday, May 2, 2011
Making Mondays: Geometric Paper Garlands
This was a great activity to do with Yashar! He loved it - the painting, the cutting and then the important job of handing me the next piece to sew ;)
To make them we first painted strips of watercolour paper with watercolour paint. While they were drying we cut lots of triangles. Then we cut the just about dry watercolour ones. We weren't too particular at all about the triangles being perfect. Yashar was very proud that he learnt to cut a triangle!
Then we lined them up on the table arranging them in a rough pattern. Then I sewed as Yashar handed me the next triangle for sewing. You can see in the photo below that we managed to work a little bit of neon pink in! (they were cut from post-it notes)
Monday, April 11, 2011
Making Mondays: Sleepy Papier Mache Birds for Spring
You might remember a couple of weeks back that I mentioned plans of making papier mache birds. Well, we did it! These were so much fun for both Yashar and I. Yashar especially loved the messiness and how tactile making these were. Apart from making the legs, drawing the eyes on, and supergluing the ribbon, Yashar made all of his little baby bird (the one with the red ribbon) himself. I'm so proud of him :))) And I became a litlle mesmerised and relaxed making my 'mama' bird too! -It turned out to be a perfect activity for both 3 year olds and 30 year olds!


This is how we did it:
1. First I made up some glue using this recipe for flour and water glue from http://www.papiermache.co.uk/
I put a small amount of the glue in a bowl and the rest in a jar to use later.
It seems like Spring is as sleepy as these birds around here...can't wait until the weather warms up!
I'll be back later in the week with a post about our crazy 'long weekend' roadtrip we just got back from.
Monday, December 20, 2010
Making Mondays: Easy Christmas Crafts for Kids
3. Once they were finished we folded the sticky sides of the contact together (to make a square). Then I quickly punched a hole in each and tied some ribbon on it, ready for hanging!
To make the Paper Christmas Wreaths:
2. On the day I put a cardboard donut out for each of the kids and Mum's helped them spread some PVA glue all over one side. I shared out the leaves and the kids arranged them on the wreaths.
I hope you're all having a lovely time in preparation for the festive season!
Monday, June 28, 2010
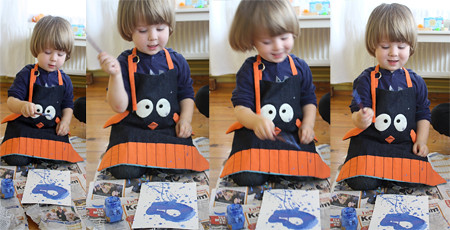
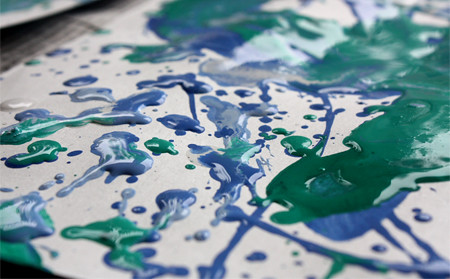
The Art and Design Projects: Jackson Pollock
The painting that I know best is Pollock's Blue Poles - probably because the National Gallery of Australia bought it (amid much scandal as it was the highest price ever paid for a modern painting at the time).
This technique is just perfect for kids to have a lot of fun! This is how we did it:
1. While Yashar was busy playing, my neice and I picked out the colours and mixed the paints. It was great to have an older child (my neice is 12) for this part - we chose colours to reflect our mood on a cool and rainy Summer day. We put the paints in small containers and bottles - so that it wouldn't be a huge mess if Yashar got carried away! We added a little water to ours to make them more 'drippable' (although we probably added a little too much - you want it drippable without then running all over the place)
2. We also cut some thick paper (canvas would also be great) and put them on the floor on plenty of newspaper.
Resources:
Pollock Krasner House and Study Centre
http://www.jacksonpollock.com/ -
The National Gallery of Australia
Books
Jackson Pollock (MoMA Artist Series)
The movie Pollock
Friday, March 5, 2010
The Fez: Crafts Around the World
Here are some 'action' photos!
And welcome to all the new visitors here coming over from the Crafty Crow! I hope you enjoy looking around. You can find lots of crafts to do with and for kids in my series of Making Mondays posts here and you can find out more about my artwork and illustrations here. Thanks for visiting!
Monday, November 30, 2009
Making Mondays: Christmas Pinecones
1. First collect some pinecones -collecting is such a fun activity with kids - we are lucky to have a tree next door that kindly drops pinecones on our steps - I like it (it drops the pinenuts too!) but my husband worries they are going to drop on Yashar's head! Yashar had fun collecting up the pinecones...with no head injuries ;)2. Make sure the pinecones are nice and dry - we had ours indoors for a while.
3. Spray with white paint. Make sure you do this in a well ventilated area (we did it outside). That's it! Perfect for a white Christmas.

Thursday, October 29, 2009
Making Mondays: Meow!
You might remember that Yashar loves cats! He's taken to running up to every single one we see in the street (which in Istanbul is a lot!) and excitedly try to pat them, while laughing in delight.
Once I played around a little, working out how to make them, they are actually fairly easy and would be perfect to make with children (older than Yashar though). This is how I did it:
Materials:
Thick paper/card
Pencil
Paints
Scissors
Double sided tape
1. To make the body I cut a strip 5 cm wide and 21cm long (the width of A4 paper). Then I drew a line 7.5cm in from each end. I drew a half circle on the outside of each side (these will be the arms/paws). Next, I folded along each line and cut the rounded part of each half circle (leaving the flat side attached). I used small scissors, but a stanley knife would be easier. I also cut two slots where there head would later be attached.
2. To make the head I cut a strip 5 cm wide and 25cm long and folded it in 3. I drew the face shape on the middle piece and cut along the outline (though all 3 pieces). Then I unfolded it and trimmed off the two little half ears at the back.
3. I also cut out a pair of paws with tabs at the top for joining to the body.
4. Next I painted the paws, head and body and left them to dry. Then drew on the features with a marker.
5. I assembled the little kitty using double sided tape by sticking the overlapping ends of each strip together at the back and sticking the foot tabs inside the body with the feet/paws peeking out at the bottom. Then I cut two slots to put the head in place on the body.
I ended up making a little family of them! Meow!! And of course, since they were cats, Yashar loved them!!!
Monday, October 19, 2009
Making Mondays: A Tree for the Seasons
Recently I was rereading Amanda Soule's The Creative Family
The plan is to make a tree, which can then have various things attached to it and changed with the changing seasons. It will take a while I think, and I hope to add to it throughout the year. Ideas are floating around my mind of leaves and snowflakes, flowers and fruit. Some birds, maybe a nest. Some could be velcro, some could be like badges pinned on.
I would love it if you made this along with me! What projects are you working on at the moment?
Monday, August 24, 2009
MakingMondays: Paw Print Paper

We had so much fun with our crafting this week! And it felt doubly good after last week's little disaster! One morning I saw some of Yashar's animal figurines all lined up on the table (my dear Senol had arranged them late at night after we had all gone to bed so that Yashar could find them like that in the morning) and for some reason it made me think of their footprints!And since Yashar loves these animals (I think I have mentioned before how he feeds them, brushes their teeth and puts them to sleep!) I thought it would be fun to make some wrapping paper with their footprints all over it that we could wrap some presents for his cousins in.
As soon as Yashar started banging the potato prints down excitedly and saying loudly 'tiger! tiger!' I knew it had been a success!
Here's how we did it:
1. While Yashar was busy with other activities my 12 year old niece and I got busy cutting the potatoes to make the stamps. We drew the shape we wanted to print on a halved potato first and then used a knife to cut around the shapes (but if you had other carving tools they would be very useful here!) And don't forget that the image will be reversed.2. I set out some red paper on a table and put a small amount of paint in a container with a flat bottom for dipping the potato stamp in. I put out white paint first and then half way through I exchanged it for some blue paint. I have started putting paints out separately like this because Yashar tends to get very excited and want to grab all the paints at once so giving him one paint at a time to concentrate is more manageable and fun for everyone! (lesson learned from last week!)
3. Then I brought Yashar to the table and explained, with the help of his little tiger what we were making. We did the first few prints together and then there was no stopping him! He loved it!
Friday, July 10, 2009
Making Mondays: Car Trip Creative Sheet
With a 6 hour journey each way for our little holiday Yashar was definitely going to need some entertainment along the way!My strategy: Lots of yummy snacks, his favourite finger puppets, his favourite friends - tiger, dog and cheetah figurines (he loves to feed them, give them drinks, bath them, wash their teeth so this is bound to be a good distraction!), a new toy that won't be pulled out until we are on the way, a pack of colouring pencils, some favourite books, great music, plenty of stops along the way and timing the trip to coincide with his nap. Fingers crossed!
I also quickly and very roughly drew up this little sheet of frames for drawing in, getting some inspiration from all the gorgeous vintage frames on Etsy.

I know at Yashar's age it is really just scribbles he is doing, but I thought this would be fun to talk about with him. I am getting tempted to do some myself! I'm thinking a series of silhouette portraits, and another sheet with a landscape in the middle and then drawing elements from that landscape in each of the smaller frames, or maybe favourite cartoon characters portraits, or landmarks along the way....so many ideas!
I like that this is not just a plain colour it in sheet, but instead will hopefully provide a basis for lots of creativity and little masterpieces!
**I had wanted to upload a copy that you could easily print but the site I usually use for making downloadable pdfs has just been banned here in Turkey :( Ahhh, the scandalous life of a crafting blogger in Turkey ;) And hence the delay for this Making Mondays. So I'm hoping I will be able to come up with a work around soon. I will update this post when I do. In the meantime you could try right clicking and printing the image...but I'm not sure if this will work :( You could, of course, draw your own gorgeous one!**
Hopefully this will make some of your car/plane/train trips just a little more peaceful!